By Harrison Gloyne, Redstack Intern
If you’re having any trouble using Autodesk Inventor, we have a whole list of support articles you can access from our blog.
Creating your parts in Autodesk Inventor may involve adding text to these parts.

How Can I have text on my part?
Adding text to parts is a very simple process, and can be achieved by following these simple steps.
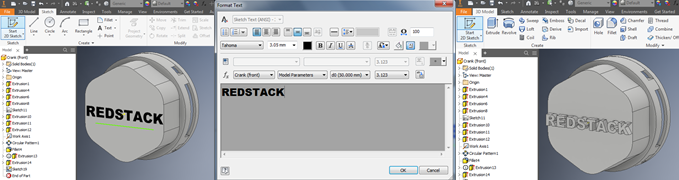
Select the face of interest and start a sketch on this face by selecting the Start 2D Sketch option from the 3D Model tab.
- Click on the text icon as shown below.
- Follow the prompts given in the format text box (ie – font, size, spacing, etc).
- Under the 3D Model tab select Emboss and follow prompts (ie - depth of embossing).
- You can have both indented and protruding text.
- Text can form to cylindrical shapes.
By following these easy steps, adding text to your parts will become effortless.
Purchase Autodesk Inventor from the Redstack online store today or learn more about Autodesk Inventor training course.
To learn more about the full range of products, training and support services available from Redstack, contact us on 1300 667 263.